Special shapes (menu entry: OpModes -> Special shapes).
After selecting this OpMode and pressing RMB, a pop-up menu appears:
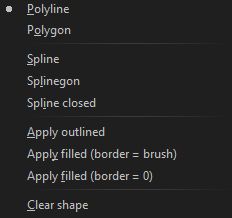
First 5 items in this pop-up menu are used to select desired shape (you can change it after the shape is drawn as well). The other items will perform desired task:
- Polyline: draws vectorial object with square grips and line between them.
- Polygon: similar as above, but starting and ending point are connected (closed).
- Spline: A spline is drawn through control points (grips).
- Splinegon: Spline is closed with simple line, i.e. closed spline is not drawn.
- Spline closed: Closed spline is calculated and drawn.
- Apply outlined: performs rendering onto canvas.
- Apply filled (border = brush): performs rendering of object and fills the area inside the object no matter if it’s closed or not.
- Apply filled (border = 0): fills the area inside the object, no matter if it’s closed or not.
- Clear shape: well, clears the shape (vectorial object).
So, how to draw an object? Let’s stick with polyline. Select polyline shape in pop-up menu and then:
- Click LMB (press and release) somewhere onto canvas: a yellow square grip is created.
- Move your mouse and click again LMB (press and release): another grip is created and red line connects previous point with new point.
- Repeat step 2. to create desired polyline. If you want to finish the object (last grip you want to create), go to step 4.
- Performy LMB double-click and you’re done.
Now, to modify/reshape the object, position your mouse on the yellow grip: mouse cursor changes to hand pointer. Good, now you can drag the grip around to reshape your object (press and hold LMB). Now click RMB and invoke pop-up menu. Select spline. Nothing happens! Object is still simple polyline. Now, move the mouse to any yellow grip and drag it a bit…voila, object has changed to spline. You can also change it back to polyline or select another object type.