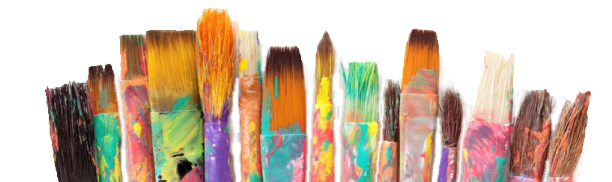
Brush (menu entry: Tools -> Brush)
Brush tool entry is one of the most important tools in Pixopedia. It covers brush settings, brush filters, bumping options, scratching, polygon filling, brush envelopes and color schemes. When Pixopedia is started, 9 internal brushes are created. When brush is selected, it’s parameters are immediately shown in this panel. Brush tool panel parameters/commands are organized in panel groups.
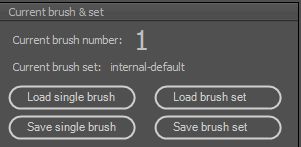
Top-most group in Brush tool contains following information and commands:
- Current brush number: currently selected brush number [1, 9].
- Current brush set: currently loaded brush set (by default, internally created brush set).
- Load single brush: load single brush under current number. Pop-up window appears; you can select desired brush stored in userdef_xml folder with extension brs.
- Save single brush: save desired brush settings. Pop-up window appears: enter desired filename and description. Brush is saved in userdef_xml folder with extension brs.
- Load brush set: a complete brush set is loaded (9 brushes); current set is replaced by loaded set. Brush sets resides in userdef_xml folder with extension bss.
- Save brush set: a complete brush set with all brush parameters is saved. Pop-up window appears; enter desired filename and description. Brush set is saved in userdef_xml directory with extension bss.
The second group contains currently available brush tips:

- Neon brush: brush with various types of intensity “fall-off” from brush tip center.
- Solid brush: brush with max mask value (255).
- Spray brush: brush consisting of “sprayed” dots.
- Star brush: lines are drawn from the center of the brush tip.
- Hair brush: Brush stamp is created from random dots.
- Parallel brush: Brush stamp is created from dots at strict position.
- Mash brush: Brush consists of random lines.
- Stamp brush: brush is selected from PNG images in bstamps foder.
- CML bush: coupled map lattice brush; a procedural brush.
As you may notice, selecting some brush from current brush set [1, 9] immediately changes selected brush tip. You can change brush tip (brush type) and it will reflect status bar entry of selected brush (brush tip on status bar will change). Also, brush specific parameters will also change according to selected brush type. Brush specific parameters will be discussed at the end of this topic.
The third group consists of page control with five tabbed pages:
- Basic: page contains brush tip parameters and brush specific parameters.
- Advanced: page contains brush filters and brush bumping parameters.
- JG rules: page contains jittering rules and geometric shapes filling rules.
- Color scheme: page contains colors group and painting scheme list.
- ES rules: page contains envelope and scratching parameters.
We will discuss each page in more details.
Brush tip parameters dictates basic behavior of selected brush:
- Pen size: the size of brush tip.
- Capacity: capacity (opacity) of brush mask; percentage of max mask value (255).
- ColorVary: sets max value for random color variation [0, 128].
- SizeVary: percentage of current brush size used as max value for random size variation.
- CapVary: percentage of current capacity used as max value for random capacity variation.
- Step: distance in pixels between two brush tips in rendering process (default: 2).
Brush specific parameters vary from type to type and will be discussed separately for each brush type.
Filters:
- Chalk effect: randomly (coin toss) draws pixel with selected color scheme.
- Invert: inverts brush intensity; associated value (threshold value) is checked against brush mask value. If mask value is greater then invert value, mask pixel will be inverted (255 – mask_value).
- Blur: blurs brush mask with associated blur radius.
- Median: simplified median filter is applied to brush mask with associated radius.
Bumping:
- Enable brush bumping: if checked brush bumping is applied to brush mask; brush mask is treated as height field and with given shift value, bumping simulates 3D brush.
- Soft bumping: if checked, besides bumping, mask value is used as capacity/opacity value when calculating final mask intensity.
- Scale: value used for multiplying bump intensity.
- Threshold: only mask values above the threshold value are bumped.
- Inverted threshold: threshold is inverted (255 – threshold).
- Roughness: max value for random bump intensity variation; gives a stroke rough a little bit of roughness.
- Shift direction: simulates direction of light; actually position of pixel inside the brush mask that will be used for calculating bump intensity.
Jittering rules:
- Perform strokes jittering: jitters brush tip around the canvas.
- Connected drawing: if un-checked, brush mask is cleared after each jitter pass. It works automatically for free hand drawing. For other shapes, you must change rendering mode in settings window to achieve disconnected drawing. By default this option is checked (connected drawing).
- Range: max random value specifying jitter range.
- Loop: number of jitters per step.
Geometric shapes filling rules (for closed shapes such as polygon, rectangle and ellipse):
- Fill over: if checked, border (stroke) is drawn first, and interior is filled over. By default (unchecked), interior is filled first and stroke is drawn over.
- Exclude interior from brush filters: if checked, brush filters are overridden for shape interior.
- Override capacity: if checked, you can set interior capacity (brush capacity is overridden).
- Blur: blurs shape interior with given blur radius.
- Color: solid single color is used for shape interior filling.
- Texture: use seamless texture for interior; double click to open texture browser (or RMB for pop-up menu).
Colors:
- Primary: primary brush color; click on associated color picker to set desired color.
- Secondary: secondary brush color: click on associated color picker to set desired color.
- Texture: seamless color texture for brush tip; double click to open texture browser (or RMB for pop-up menu).
- Background tile: seamless gray-scale background tile, used for simulating various types of paper/backgrounds; double click to open background tiles browser (or RMB for pop-up menu).
- Current palette: rectangle displaying current palette (256 entries); double click to open palette window if you want to change or create your own palette. Palette will be saved in userde_xml directory with extension pxp.
- Palette: combo box with procedural and saved palettes. There are two types of procedural palettes (Interpolate BGR – default and Interpolate – short palette). The first one creates palette from blue to green and red, while the second one takes current short palette and stretches it to 256 colors. This option is used to associate short palette to single (current) brush with full 256 palette entries.
- Pal/grad stepper: sets step value for changing palette/gradient entry index for color schemes involving step-wise changes.
- Automatic stepper for delayed shapes: if checked (default), delayed shapes (all shapes except free hand shape) pal/grad step is calculated automatically; if unchecked, pal/grad stepper value is used.
Note: Setting texture/background tile is done using texture/tile browser. Click on desired texture/tile in image list and then drag it to appropriate box. You can drag tile to texture box and vice versa, but pixel format will be internally changed (to 24 bits for textures and 8 bits for tiles).
Painting scheme:
- Primary color: draws a stroke using brush primary color.
- Secondary color: draws a stroke using brush secondary color.
- AlphaMix primary and secondary color: mixes primary and secondary color depending on brush mask value; for strictly solid brushes (without blur filter), only primary color will be drawn.
- SolidMix primary and secondary color: same as above, but outputs resulting mix as solid stroke.
- Alpha palette: uses brush mask values [0,255] as index value for palette entry.
- Solid palette: same as above, but outputs result as solid stroke.
- Step palette circular: depending on pal/grad stepper value, after step value is achieved, palette index is changed (starts from 0). When palette index goes beyond maximum value (255), index is set back to 0 and the whole procedure is repeated.
- Step palette forward-backward: when palette index goes beyond max value, stepper sign is changed and index goes down to 0 by each step. When 0 value is reached, sign is changed again.
- Step palette forward only: starts from index 0 and when index reaches 255, it stays 255 until mouse button released (stroke is finished).
- Random palette entry: palette index is calculated in random fashion.
- Texture aligned: when some seamless texture is set, stroke will be drawn using aligned texture, i.e. when brush tip passes the texture edge, opposite side texture pixels will be used.
- Texture fixed: texture is “stamped” to brush tip; there is no texture alignment. Texture is “pushed” by the brush tip.
- Clone image aligned: similar as texture aligned, but colors are picked from current or any other image loaded in IMA; press letter C (case insensitive) at desired position in desired image to get clone point). Once the first stroke is drawn, it will keep track of current clone image position.
- Clone image repositioned: similar to clone image aligned, but when stroke is finished, clone image position is reset (re-positioned).
- Clone image fixed: similar to texture fixed.
- Image mouse down color: actually simple color spread; color is picked from current image at current mouse position.
- Image mouse step color: color is changed on every step.
- Sine colore: no color at all, brush tip is color-less. Well, it seams a stupid option, but it’s not. If you have some image loaded (not the white one) and bumping is on, you’ll get bumped stroke with current image as a texture.
- Sidekick image aligned: similar to texture/clone image aligned; sidekick assistant image is used as a texture.
- Step gradient primary/secondary circular: similar to step palette circular, but using gradient between primary and secondary brush color as palette.
- Step gradient primary/secondary forward-backward: similar to step palette forward-backward.
- Step gradient primary/secondary forward only: similar to step palette forward only.
- Alpha short palette: similar to alpha palette, but using current short palette.
- Solid short palette: similar to solid short palette.
- Step short palette circular: similar to step palette circular.
- Step short palette forward-backward: similar to step palette forward-backward.
- Step short palette forward only: similar to step palette forward only.
- Random short palette entry: randomly picking short palette colors.
Stroke envelopes:
- Size env. (size envelope): it’s a string (pattern) with comma separated integer values, representing percentages of current brush size. This field is editable combo-box with some preset examples, so let’s describe how it works on second example: 10,40,80,100,80,40,10. Stroke will begin with 10% of current brush size, then it will increase to 40%, 80% and finally to 100%. Then it will go back to 80%, 40% and 10%. The rest of stroke will be drawn with 10% of brush size (if repeat size env. is unchecked).
- Capacity env.(capacity envelope): similar to size envelope, but this time we are controlling capacity/opacity variation.
- Repeat size env.: if checked, current size pattern will be repeated through the stroke.
- Repeat capacity env.: if checked, current capacity pattern will be repeated through the stroke.
- Manual resolution: if unchecked, when delayed shapes are used (line, poly-line, ellipse, etc…) resolution between pattern elements is automatically calculated. Otherwise, given resolution value will be used.
Note: to remove current envelope, simply delete pattern in respective field.
Scratching:
- Scratch style: you can select desired scratch style from combo-box to apply stroke scratching effect. Entries are more or less self explainable.
- Thickness: scratch thickness (width/diameter).
- Scr. num per 100×100: number of scratches in 100×100 pixels square.
What’s left to discuss in this chapter are brush specific parameters. As previously mentioned, every brush tip, besides common parameters has it’s own specific parameters. We will discuss them for every brush tip.
Neon brush
- Linear: linear intensity fall-off from brush tip center. Slider value specifies percentage of brush tip (size) for which fall-off is calculated. The rest of brush tip has constant value.
- Quadratic: quadratic intensity fall-off from brush tip center.
- Trigonometric: intensity varies following sine function. Associated slider value is used to set sine function frequency.
To see the difference between various fall-off options, here is a rough diagram:
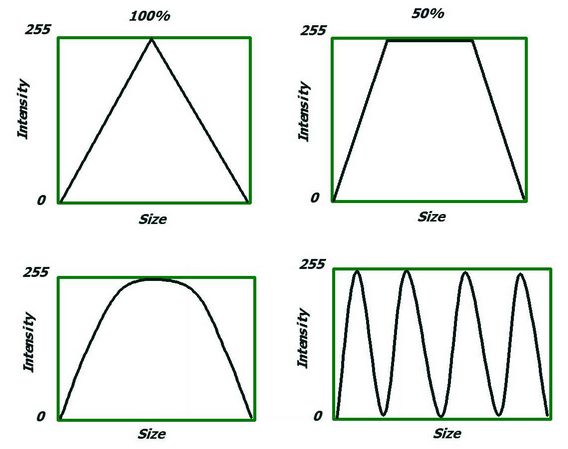
The first diagram (top-left) shows how intensity changes from brush tip center towards brush tip edge for linear fall-off option with slider value set to 100. The second diagram (top-right) shows intensity fall-off when slider value is set to 50: on a circular ring (annulus) that covers 50% of complete brush tip area, linear fall-off is applied, while the rest of brush tip area (50%) has constant (maximum) value. Quadratic and trigonometric intensity fall-off diagrams are shown in bottom row.
Note: Trigonometric fall-off option is best experienced with large step values.
Solid brush
This brush type uses maximum intensity value (255). Three shape types are available (circle, square and triangle).
- Circle: circular brush tip.
- Square: square brush tip.
- Triangle: Triangle brush tip. When selected, additional Angle parameter is visible. If this parameter is unchecked, triangle is drawn using random angle, otherwise, user defined angle is used.
- Filled (check-box): if checked, solid (filled) shape is drawn. If unchecked, additional parameter Thickness appears; used to set thickness (pen width) of selected brush shape.
Spray brush
Spray brush consists of small dots “sprayed” inside brush tip area; controlled by following parameters
- Thickness: dots size in pixels.
- IntVary: dots random intensity variation (max value).
- Gravity: “gravity” strength; how much the dots will be attracted to brush tip center.
- Density: dots density.
Star brush
Star brush consists of radial lines from brush tip center towards the brush tip edge.
- Thickness: line width in pixels.
- IntVary: lines random intensity variation (max value).
- Density: lines density.
Hair brush
Hair brush is very similar to spray brush, with one big difference: in spray brush, random dots are re-created for each step, while in hair brush, dost are created once (on mouse down) and are stamped through the stroke. Also, there is no gravity parameter.
- Thickness: dots size in pixels.
- IntVary: dots random intensity variation (max value).
- Density: dots density.
Parallel brush
This brush type consists also of dots, but dots are not position randomly, rather in controllable (strict) manner. Three shape type are available:
- Simple: dots are drawn in the line with given size and spacing.
- Cross: dots lays on two perpendicular lines.
- Tube: dots are drawn on the circle (brush tip edge).
Shapes are controlled by following additional parameters:
- Thickness: size of dots in pixels.
- IntVary: dots ransom intensity variation (max value).
- Spacing: distance between each successive dot.
- Angle: line angle; angle of virtual line used to control dots layout.
Best experienced when step is set to 1.
Mesh brush
This brush consists of mesh of random lines.
- Thickness: width of lines in pixels.
- IntVary: lines intensity random variation (max value).
- Density: lines density.
Stamp brush
All previous brush types are procedural brushes. This brush is actually gray-scale PNG image. These images (brushes) can be find in bstamp folder and are loaded by double clicking white area inside Stamp brush selection box (alternatively, you can use RMB to invoke associated pop-up menu). This will open an image list with available brush stamps. Similar to textures/background tiles, select desired brush and drag it white area. Brush stamp with be scaled according to Pen size value.
CML brush
Coupled map lattice brush is another procedural brush, based on cellular automata (more precise on coupled map lattice) and has a huge number of parameters, which are totally user-unfriendly. I will simplify CML brush in one of the next versions and then write a full description of parameters usage.
Conclusion
Huh, I’m done. This was a huge (but important) chapter. One thing that can make a little bit of confusion: as you may notice, there is CapVary parameter in common brush parameters and also IntVary in brush specific parameters, for some brush types. So, what is the difference? They both vary intensity. That’s correct, but CapVary value varies owerall brush tip intensity/opacity, while IntVary varies brush tip details.