Auto-brush settings (menu entry: Tools -> AutoBrush settings).
This tool entry is used to set auto-brushing modes and parameters for Spreader action when Automatic brushing shape is selected.
Auto-brush or Autobrush tool panel is divided in three sections:
- Autobrush mode: a list of available auto-stroke algorithms.
- Selected mode options: parameters related to selected mode.
- Global autobrush options: parameters related to all modes available.
Before we describe available modes in more details, we will first discuss global options sections.
Global autobrush options
Global options controls seeding method, strokes masking style, interaction between strokes and input image, selection and output behavior. But first of, let’s see how actually auto-brushing works. For example, let’s say we decided simple line strokes:
- Select Spreader action. By default, shape is set to free hand.
- Click RMB somewhere over the image and select Automatic brushing.
- Drag a line anywhere inside active image and release mouse button.
- Pixopedia starts auto-brushing thread and pop-up info window appears (auto-brushing is running).
When line is dragged and released, array of points is created according to seeding method selected. Each point inside seeding array is used as stroke starting point. The length of stroke is determined by the length of dragged line or rectangle diagonal (in case of moment based strokes placement) and stroke with is, of course, equal to brush size. Complete process can run very fast for simple spreader mode, but can take a while for complex spreader modes (strokes warping). Do not use big stroke lengths with complex spreader modes. Well, you can kill auto-brushing thread whenever you want. Global autobrush parameters are divided in three sections (pages): General, Additional and Multi-pass.
General parameters
- Seeding method:
- Grid dithered: points are seeded inside the grid cells (cells size is controlled by seed window slider). Each point is put in the middle of the cell and then randomized a bit (dithered).
- Grid fixed: same as above, but without dithering.
- Random: points are seeded randomly.
- Adaptive dithered: points are seeded the same ways as with grid dithered, but the size of cells depends on the stroke length.
- Seed window: in case of grid seeding it specifies the size of each cell. In case of random seeding, number of seeding points is calculated by dividing image size (width*height) with seed window value.
- Shuffle seeding array: in case of grid/adaptive seeding, seeding array is populated by from image top-left corner to bottom-right corner. When this option is checked, the order of seeding points are shuffled. Although this option is unchecked by default, better results are achieved when this option is on.
- Update input image under stroke: if checked, input image will be updated after stroke is drawn (actually the copy of input image).
- Watch autobrush: if checked, image view will be updated after each stroke is drawn. This option slows down the process, but is fun to watch.
- Skip when seeding point is outside selection: if checked and selection is active, stroke will not be drawn if seeding point is outside the selection.
- Stroke masking:
- Soft masking: standard soft masking (brush mask) is applied. If brush has some intensity fall-off, mask intensity is not modified.
- Hard masking: no matter of brush mask intensity value, mask value/intensity is set to maximum (255).
- Draw over previous stroke: does not mask the are of stroke already drawn.
Additional parameters
- Copy final mask to assistant mask (if exists): if checked and if assistant mask exists, final strokes collection (mask) will be copied to assistant mask.
- Fill canvas before rendering: if checked, output image canvas will be filled with selected color.
- Blend brush with output image: if checked (default), brush/stroke blending is performed directly with output image (foreground surface), otherwise, brush blending is performed using background surface.
- Perform color arithmetics with output image: if checked (default), pixels arithmetics is pefromed with output image pixels, otherwise, arithmetics is performed using background surface.
Multi-pass parameters
- Multi-pass mode: combo box with available multi-pass modes:
- None: single pass mode, standard autobrushing – single brush/single pass.
- Automatic – current brush: performs multi-pass autobrushing using current brush.
- Automatic – adaptive 1,2,3,…: performs multi-pass autobrushing starting from brush 1 up to brush n (depending on number of passes), decreasing brush size by selected value.
- Automatic – fixed 1,2,3,…: performs multi-pass autobrushing, similar as above, but with fixed brush sizes for each brush tip. Brush sizes are not changed with each step.
- Manual – using sidekick: performs manual multi-pass autobrushing using sidekick image as background surface.
- Steps: number of multi-pass steps. This parameter does not have any effect when manual mode is selected.
- Size factor%: factor (percentage) used to decrease initial brush size for each subsequent step. This parameter does not have any effect when “Automatic- fixed” mode is selected.
- Length factor%: factor (percentage) used to decrease stroke length for each subsequent step.
- Color error: threshold value used to determine if the stroke will be drawn or not. This value does not apply for the first step, except when manual mode is on and output image is not equal to sidekick image. Color error is calculated comparing background surface with output image.
- Color difference mode – specifies the algorithm for calculating color difference:
- Luminance: color luminance is used for calculating color error. Absolute difference between current output pixel luminance and background surface pixel luminance is used as error value.
- Euclidean: Euclid distance between output pixels and background surface pixels is used as color error value.
- Channels: difference between output pixels and background surface pixels is calculated for each channel and summed into color error.
Note: when some automatic multi-pass option is selected, it’s highly recommended to use adaptive dithered seeding mode, especially when automatic – current brush or automatic – adaptive modes are selected, because strokes are drawn from coarser to finer with different brush sizes and with adaptive dithered mode, seeding grid is adjust to brush size for each step.
Autobrush modes and options
This section covers currently available autobrush modes and theirs related parameters:
- Line strokes – simple straight lines/strokes will be drawn in the direction of dragged line with specified/selected dithering options:
- None – all strokes in same direction: no dithering, strokes are drawn int the direction of dragged line….boring.
- Dither stroke angle: stroke angle will be dithered by dither percentage. Angle is modified, but stroke length remains the same.
- Dither stroke ending coordinates: very similar to option above, but this time stroke ending point is dithered by given percentage. Angle and stroke length are modified.
- Dither percentage: slider used to set dither percentage value.
- Single step radial sweep best fit strokes – draws strokes following pattern of pixels with similar values, trying to follow image structure/texture . The method is similar to gradient (normal to gradient) drawing and is described in the article on Paperology page. Stroke angle is calculated by scanning selected grayscale image pixels:
- Grayscaled original image: original image is converted to grayscale image and used for scanning process.
- Assistant mask: if mask is available, assistant mask will be scanned. If not, the first option is used.
- Assistant contour: if contour is available, assistant contour will be scanned. If not, the first option is used.
- Least successive pixel difference: if checked, algorithm checks for the smallest pixels difference between each successive pixels.
- Calc. direction %: percentage of calculated direction (angle) against original direction (dragged line angle). When this value is set to zero, simple line strokes are drawn.
- Multi step radial sweep best fit strokes – like previous method, stroke follows pattern with similar pixels value, but this time in multiple steps. Initial line length is divided by “max steps” parameter value and sweep scan is performed for each “sub-stroke”. With this method, more “curved” strokes are drawn. Only extra parameter in this method is previously mentioned “max steps” parameter, specifying number of “sub-strokes”.
- Moment based strokes – this method was firstly proposed by Michio Shiraishi and Yasushi Yamaguchi from Tokyo University and detects stroke direction/angle using image moments. When this method is selected, instead of line dragging, a rectangle is drawn. Rectangle area is used as ROI (region of interest) for image moments calculation which finally gives stroke angle and stroke width, which can be used to override brush size:
- Fixed stroke width (brush size): stroke width does not change. All strokes will be drawn with equal brush size.
- Adjust brush size according to stroke width: calculated stroke width is used to adjust brush size. Each stroke drawn will have different brush sizes.
- Color tolerance: if absolute pixels difference is below this value, pixel colors are treated as equal.
- Logarithmic fall-off from central point: stroke intensity will have logarithmic intensity fall-off from rectangle’s center (ROI).
- Pointilize – this is the simplest method for strokes placement. It actually draws only brush tip depending on seeding points coordinates. Brush size is determined by dragged circle diameter.
- Contour tracing strokes – this mode uses “OpenCV findcontours” silent lua script for calculating contour points. After points are calculated, Pixopedia draws strokes using exported contour points.
As previously mentioned, when auto-brushing process thread is running, a modal info window pops-up. There is an information of processing stage (percentage), time elapsed and step. Also, there are two buttons: Exit! and Pause. When exit button is pressed, auto-brushing process is killed and current image is returned to previous state. When pause button is pressed, auto-brushing thread is suspended and another button (save) appears:
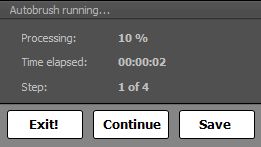
You can continue process, or you can click Save button which will save current image state and terminate the thread: all strokes drawn so far will be committed.