Master/slave IMA viewing mode is used to display two images in single page tab and enables various inter-image operations. When this mode is selected, current image (master) is copied to another view (slave) and vertical bar appears (with lot of ugly icons). Next to the vertical bar, from it’s left side, there is a splitter, used to control master/slave viewers area. The left view (master) retains all functionalities of standard single view (you can draw strokes, apply actions, etc…), while the right view (slave) has only layer manipulation functionalities (OpMode).
Now something about vertical ugly icons bar. Here is a description of actions related to each icon (top-down):
![]()
| Icon | Description |
|---|---|
| Copy selected region to new slave layer | If there is some selection in master view, selected image are will be copied to new slave layer. |
| Copy marked region to new slave layer | If Marker action is selected and there exists marked area in master view, it will be copied as new slave layer. |
| Copy master layer to new slave layer | Copies selected master layer to new slave layer. |
| Copy master image to slave image | Copies complete master image to slave image. This is done by default when you switch from standard mode to master/slave mode. |
| Copy slave image to master image | Copies complete slave image to master image. |
| Exchange master slave contents. | Swaps master and slave images. |
| Import slave image | Open image dialog is invoked and selected image will be loaded as slave image. |
| New slave image from clipboard. | If there is an image in clipboard, it will be copied to slave image (background). |
| Import image as new slave layer. | Open image dialog is invoked and selected image is loaded as new slave layer. |
| New layer from clipboard | If there is an image in clipboard, it will be copied to new slave layer. |
| Correct layer colors using slave image color data | Color correction will be applied to selected slave layer. Colors of selected layer will be adjust according to slave image (background) color data. |
| Undo last layer operation | Currently, you can undo only the last operation on selected slave layer. |
| Delete current (selected) layer | Deletes selected slave layer. |
| Stamp: fix and merge all layers on slave canvas | This action will fix all slave layers and merge them onto slave image canvas (slave background). |
| Settings… | Shows small panel, glued to vertical bar. Used for slave layers settings/options. |
| Layer blending… | Shows small panel, glued to vertical bar. Used for setting current salve layer blending mode and transparency (opacity) value. |
| Dyadic operation | Opens small modal form for performing dyadic operations between master and slave images (background images). Currently, only standard blending modes are available. When Accept button is pressed, dyadic operation is applied to slave background image. |
Settings
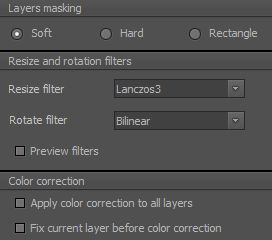
When Settings button is clicked, a panel glued to vertical bar appears:

Settings panel is used to set slave layers behavior on layers manipulation. These settings apply to all slave layers:
- Layers masking: hmm, I must check the code.
- Resize and rotation filters: selected resize and rotation filters will be used when layer fixation is performed. Checking preview filter, selected filter will be apply in vivo, which can slow down resizing/rotation of layer.
- Color correction: The first check box, when checked, will apply color correction to all layers automatically when stamping is performed. The second check box, when checked, will perform layer fixing prior the color correction. When unchecked, color correction will be applied after layer fixation.
Panel stays visible until Settings button is clicked again.
Layer blending
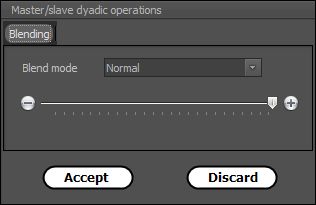
When Layer blending button is clicked, a panel glued to vertical bar appears:

You can set current layer blending mode and transparency (opacity). Panel stays visible until Layer blending button is clicked again.
Dyadic operations
When Dyadic operations button is clicked, a modal form glued to vertical bar appears:

This modal form is used to apply dyadic operations between master and slave background images. When Accept button is clicked, selected operation is applied onto slave image canvas. Currently, only “standard” blending operation is supported.
Slave layers manipulation
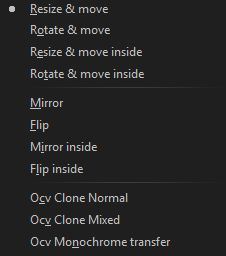
As previously mentioned, slave view has only layer manipulation capabilities; clicking RMB, a pop-up menu appears:

Pop-up menu is very similar to standard Manipulate layers OpMode for single/master image with two additional features:
- Mirror inside: mirrors layer content, but does not mirror alpha channel.
- Flip inside: flips layer content, but does not flip alpha channel.
All other items has the same functionality as in standard Manipulate layers OpMode.
So, what’s the big deal?
With master/slave mode, you can play with content of two images. By default, when you switch to master/slave mode, two images are identical and you can modify the content of slave image without altering original image. But the real deal comes when you load another (different) image in slave view. Now, you can copy a part of master image to slave image, swap faces using Lua script, seamlessly clone parts of master image to slave image, etc…
When you’re done, you can swap master/slave images and save your work as a new image.
